CADWorx Plant Professional 2016 I tab: LNum > Setup
Line Number toolbar: Setup
Plant menu: Accessory > Line Numbers > Setup
Command line: NUMBERSETUP

Modifies any line number configuration. You can turn the line numbering system on or off. If the system is on, it can operate in a static or dynamic mode.
In the dynamic mode, CADWorx adjusts the line number according to the size or specification. In the static mode, you must manually change the size and specification. Static is useful when all components and sizes of a particular piping run are required to have the same line number (such as, the 3/4″ vent on an 8″ process line needs a line number of 8″-150-2001-N). Static line numbering is also useful when selecting runs of piping for other functions with CADWorx. For more information, see LineNumberSystem.
This system also works with a CADWorx P&ID setup configuration file. You can change the configuration file location in SETUP to use the same project configuration as any P&ID project. For more information, see Setup. Click Add in the Category group in this dialog box to select additional fields located in the process lines table of a typical P&ID project database. When using a P&ID project, changes made to a line number configuration within CADWorx reflect within the P&ID project.
If the system is not using a CADWorx P&ID setup configuration file, the additional fields are obtained from the DATABASE.TBL file located in the [Product Folder]\Plant\System folder. You must manually edit this file for any modifications required of the existing fields within the default line number system.

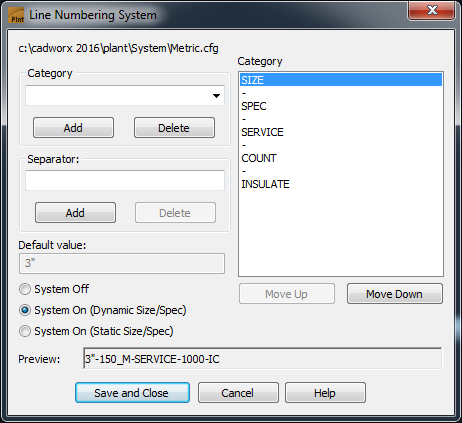
Line Numbering System Dialog Box
Controls parameters for line numbering systems. The name of the current configuration file displays at the top of the dialog box. You can also use a P&ID project configuration file.
Category
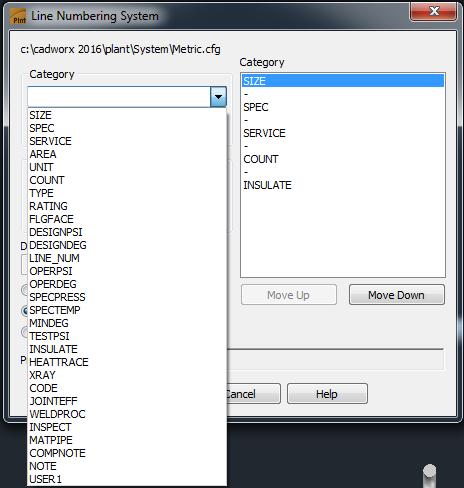
Specifies the active process line item. The list contains the process line items from the Database.TBL file in the [Product Folder]\Plant\System folder. You can add these items to any line number system. After you select an item, click Add to place it in the Category list. Highlight the item in the right list box, and then click Delete to remove it from the line number system. You can also type in a value, and then click Add.

Add
Adds the item from the Category box to the Category list.
Delete
Removes the selected item from the Category list.
Separator
Specifies a separator character. Type an alphanumeric value (including special characters such as –, ~, #, or SPACE). Click Add to place it in the Category list. Highlight the item in the Category list, and then click Delete to remove it from the line number system.
Add
Adds the separator character to the Category list.
Delete
Removes the separator character from the Category list.
Default Value
Adds any default value to any category included in the Category list. The size and specification are disabled if the system is set to the dynamic mode.
System Off
Indicates that line numbers do not place in the drawing.
CONVERTFROMPRJDATA updates all selected components in the drawing to your current settings. If you run CONVERTFROMPRJDATA with this setting and do not have the Line number check box in the Apply Change Data Rule dialog box selected, the software erases your line numbers in the components you select for update. For more information, see Apply Change Data Rule Dialog Box.
System On (Dynamic Size/Spec)
Indicates that each component placed in the drawing receives a line number.
CONVERTFROMPRJDATA updates all selected components in the drawing to your current settings. If you run CONVERTFROMPRJDATA with this setting and do not have the Line number check box in the Apply Change Data Rule dialog box selected, the software changes your line number to the current values. For example, if you set the count to 1500, change a line number to 1506, and then run CONVERTFROMPRJDATA, the software changes any values in the line numbers back to 1500. For more information, see Apply Change Data Rule Dialog Box.
System On (Static Size/Spec)
Indicates that the line number system uses the value in the Default value box, including the size and specification. This allows you to type anything for the size and specification.
CONVERTFROMPRJDATA updates all selected components in the drawing to your current settings. If you run CONVERTFROMPRJDATA with this setting and do not have the Line number option in the Apply Change Data Rule dialog box selected, the software changes your line number to the current value set in Default Value. For example, if you have a line number specification set to 600, with a Default Value of 150, and then run CONVERTFROMPRJDATA, the software changes any values in the 600 specification line numbers back to 150. For more information, see Apply Change Data Rule Dialog Box.
Preview
Displays the line number based on the selected categories. The line number added to components looks similar to the Preview value.
Move Up
Moves the selected item higher in the Category list. The new order also displays in the Preview box.
Move Down
Moves the selected item lower in the Category list. The new order also displays in the Preview box.
Save and Close saves the current settings to the configuration file when you select the Line Number Setup check box in Miscellaneous CFG Content in the CADWorx Plant Setup. For more information, see Miscellaneous CFG Content, and Setup.
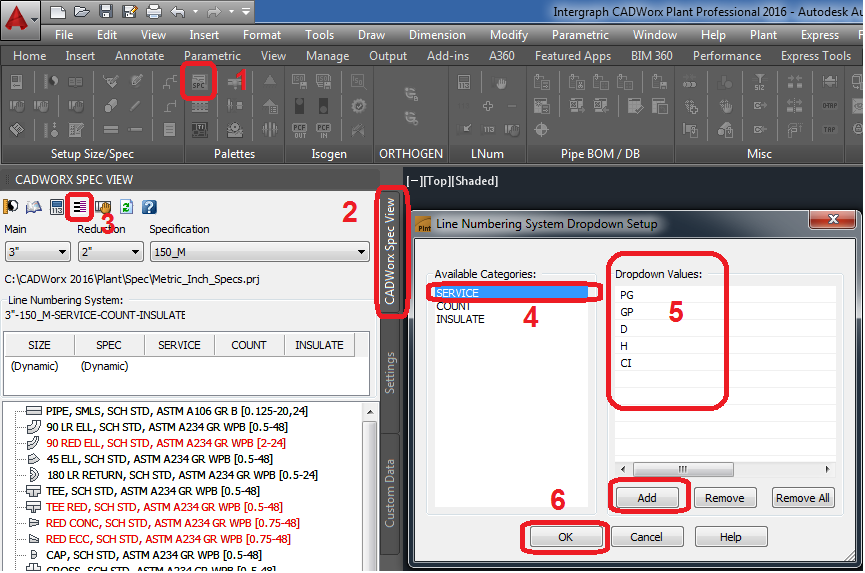
And Line Number Category list can be in pull down list
CADWorx Plant I tab: Palettes > Spec View
Palettes toolbar: Spec View
Plant menu: Palettes > Spec View
Command line: SPECVIEW >> Numbering System Dropdown Setup

LINE NUMBERING SYSTEM DROPDOWN SETUP DIALOG BOX
Controls parameters for adding items to the line numbering list that appears with the line numbering system. These values are stored in the DropDownList.TXT file. This file is located in the same folder as the current configuration settings.
Available Categories
Lists the categories for which you can assign dropdown items. Select an item from the list to make it the active category.
Dropdown Values
Lists the assigned dropdown items for the active category.
Add
Adds an item to the Dropdown Values list.
Remove
Removes the selected item from the Dropdown Values list.
Remove All
Removes all of the items from the Dropdown Values list.

